Add a Frontend Server
After adding a Virtual IP (VIP), a Frontend Server must be configured to define how incoming traffic is received and processed.
- Navigate to TCP Config Click on TCP Config from the left navigation menu

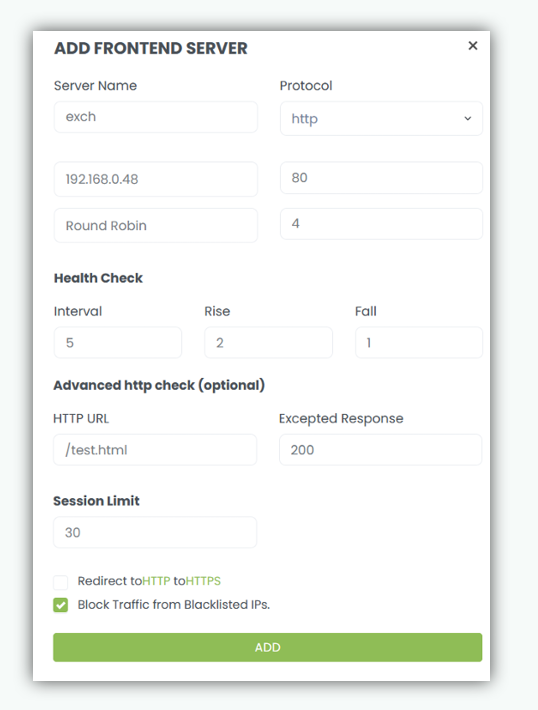
When the ADD FRONTEND button is clicked, the server configuration popup is displayed. This popup is used to define how incoming client traffic is received on the Virtual IP and forwarded to backend servers.
Frontend Configuration Fields
Server Name
Enter a descriptive name for the frontend service.
This name is used for identification and management within nBalance.
Examples: CRM,ERP,HRMS
Protocol
Select the protocol or service type used by the backend servers. Common options include:
- HTTP
- HTTPS
- TCP The selected protocol determines how traffic is processed and forwarded.
Note
For SSL‑based protocols (such as HTTPS), a valid SSL certificate must be uploaded before completing frontend configuration. Upload the required certificate under: System & Maintenance → SSL Certificates See: See Certificates
IP Bind
Select the Virtual IP address on which this frontend will listen for incoming client connections. Only Virtual IPs already added (earlier) in the system will appear in the drop down.
Port
Specify the port number on which the frontend service should accept traffic. Examples:
- 80 for HTTP
- 443 for HTTPS
- Custom service ports as required
Load Balancing Method
Select the load balancing algorithm used to distribute traffic across backend servers. Common methods include:
- Round Robin – Requests are distributed sequentially among backend servers
- Least Connection – Requests are forwarded to the server with the fewest active connections
RTO (Seconds)
Defines the Response Timeout value, in seconds. This specifies how long the load balancer waits for a response from a backend server before considering the request as timed out. Recommend: 15 seconds.
Health Check Settings
Interval
Specifies how often (in seconds) the load balancer sends health check requests to backend servers.
Default: 5 seconds.
HealthyCount
Defines the number of consecutive successful health check responses required for a backend server to be marked as UP and included in traffic rotation. Default: 2
UnhealthyCount
Defines the number of consecutive failed health check responses required for a backend server to be marked as DOWN and removed from traffic rotation. Default: 1
Advanced HTTP Check
HTTP URL
Specify the HTTP path used for health check requests.
This endpoint should return a valid response when the backend server is healthy.
Examples: /test.html, /logo.png, index.html
Expected Response
Defines the expected HTTP response status code from the health check URL. Typical valid response codes:
- 200
- Other application specific success codes as required If the expected response is not received, the health check is treated as a failure.
Session Limit
Specifies the maximum number of concurrent active sessions allowed per backend server. This helps prevent server overload and ensures fair traffic distribution.
Redirect HTTP to HTTPS
When enabled, all incoming HTTP requests on this frontend will be automatically redirected to HTTPS, ensuring secure access.
Save Configuration
Click Add to create the frontend server.
After adding Virtual IP follow the below steps: Click on ADD FRONTEND button. When frontend is added, it will display under the corresponding tab under the same page. The tab contains following fields:
- Service/Frontend Server: Give a name to your frontend server (Ex: - EXCHANGE)
- Protocol: click here to select a protocol/service of the real/backend servers (e.g. – http, https)
- Bind: Select the Virtual IP Address you added to the Frontend Server.
- Balance Method: Here you can select the balancing method. e.g. DNS Round Robin, Least Connection. If you select Round Robin, it will give the IP Address from the group separately from one by one. In Least Connection, it directs incoming network traffic to the server with the fewest active connections at any given time.
- Interval: Load Balancer sends a heartbeat to the server in every specific interval. By default, it is 5 sec.
- Fall: Specifies the number of failed counts that a heartbeat check failed to send a failure report that the server is down.
- Rise: No. of success counts that a heartbeat check occurred to activate the server and send an active message. Advanced http check (optional): active frontend and real/backend servers added by the user.
- Active health checks: You can proactively check the health of your backend servers and remove them from the load balancer rotation until they're up and running again. ALOHA provides a way to monitor the health of your servers using the HTTP protocol.
- HTTP URL: It will help the user to send and receive a code request.
- Expected Response: The option advance health check sends an HTTP request to the server and expects to get a successful response. The response status code should be in the 2xx/3xx/4xx to consider it as successful. Session Limit: It restricts the number of concurrent or active sessions that can be maintained on a particular
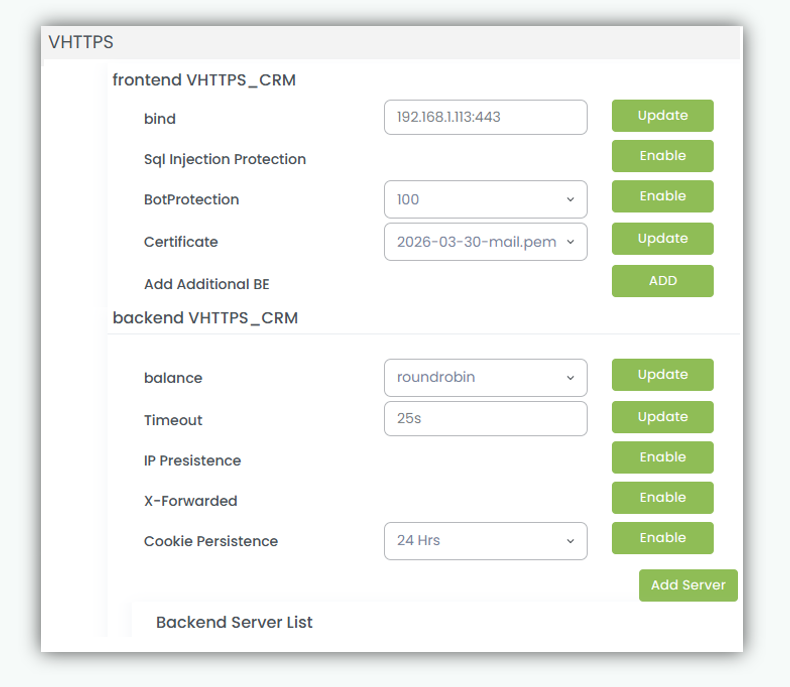
Frontend Server Added
The screenshot below shows a successfully configured Frontend server. This page displays the frontend binding details along with the available configuration controls.